
Over the past few years I have written loads of articles and built quite a few "fun" or complex circuits. Some using EPROMs, Integrated Circuits, TTL, CMOS and many of those "hard-to-get" components, especially radio-frequency crystals. A lot of my experience, however, lies in radio receivers, especially for hamradio use, using cheap, inexpensive and commonly available components. In this project I will show you the second receiver I ever built in my life. Yes, it does date back a few years, but it may soon have a PCB to accompany it. No promisses at this stage.
The basic receiver covers the full Medium Wave band and detects Amplitude Modulation (AM). It can also be used as a tuneable IF stage for an AM general coverage HF receiver. The receiver may also be extended into the HF band and used with a converter to receive air traffic between 115 and 125MHz. The basic receiver, however, is both simple; an ideal first receiver project and has quite a good performance for such a simple design.
The circuit is very simple and is basically a "Tuned Radio Frequency" (TRF) receiver. There were many variations of this design published in the 1960's and often built into the more expensive toys (as featured in black/white adverts on the 405-Line telly!). L1 is tuned with the 270pf variable capacitor across the Medium Wave band; 550KHz to 1.65MHz. L1 is a "Loopstick" or "Ferrite Rod" antenna. The signal from the loopstick is fed into the base of the first transistor, TR1, by the pickup loop; L2.
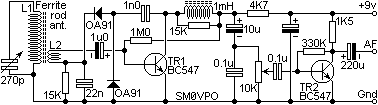
The 1mH RF choke prevents the amplified radio frequency signal from passing to the output circuit, the RF is only passed through the 1nf capacitor to the two germanium diodes, where it is rectified to recover the audio signal. If you have a problem locating a cheap germanium diode, then try N R Bardwell in the UK.
The audio signal is presented back through the loopstick antenna pickup coil winding and back to the base of TR1. TR1 will now amplify the audio signal. Since the audio is relatively low in frequency, it WILL pass through the 1mH RF choke to the output stage. Notice how TR1 has been used twice; it amplified the RF signal, then after detection it amplified the recovered AF signal. This double-duty is known as "reflex" action and gives this receiver a gain advantage over many other TRF designs. It is unusual for a TRF receiver to have sufficient sensitivity to do-away with an external antenna.
TR2 amplifies the received AF signal to a level that will drive the LINE-IN of your HiFi or computer. It will also drive medium sensitivity headphones. Back in the 60's I used a crystal earpiece, the ones that you stuff into your ear and give you continuous ear infections.
There is nothing particularly complicated about the circuit when it comes to assembly. When I first built this particular circuit I nailed brass panel pins to a wooden board and soldered the components to the pins. At the moment I am working on a printed circuit board, but then I am also working on loads of other projects. One fine day I may finish this one.
The ground/Earth conductor on the board should be as short as possible, or have as great a surface area as possible. There should also be as large as possible space between the loopstick antenna and the 1mH choke. The coils should be so orientated that there is minimum mutual coupling (one horizontal, the other vertical). Adding a small capacitor of about 2.7pf, between the colector of TR1 and the top of the loopstick winding, will increase sensitivity and reduce the bandwidth quite a lot. If the capacitor is too high in value then it may break-out into oscillation at some setting of the tuning dial. If adding the capacitor degrades prformance, then reverse the connections to L2.
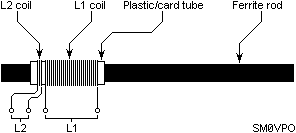
The loopstick antenna coil is best wound on a bit of cardboard or plastic tube around the ferrite rod. The coil can then be slid along the rod to adjust the tuning range. Use this to set the low-frequency end of the band. If you need to set the upper end of the band then place a capacitor across the tuning cap and re-adjust the low end of the band again.
The biggest threat to the frequency range is the bandwidth. If the bandwidth is too wide then it will receive several stations simultaneously. Since the bandwidth is determined by the "Q" of the single tuned circuit and is typically 1% - 2% of the frequency, then higher frequencies will have an unacceptably wide bandwidth. For 550KHz using a ferrite rod antenna, the bandwidth is typically 10KHz. This is almost perfect. At 1.6MHz the bandwidth is wider, but the "Q" also rises, resulting in a bandwidth of typically 20KHz - acceptable! At 10MHz, the receive bandwidth is likely to be 250KHz, so over 50 broadcast channels will fall within the receiver pass-band. But let us continue, anyway.
Here are the number of turns of wire to wind on L1 for different bands. Note that the number of turns is only a guide and some adjustment may be necessary, depending upon the ferrite rod you have, even the particular tuning cap you have. There's no reason why you cannot use a 150pf or even a 500pf tuning capacitor. The range will alter, that's all.
| Band | Frequency range | L1 (uH) | L1 | L2 |
|---|---|---|---|---|
| 0 | 40KHz - 120KHz | 60 mH | 4500 turns | 45 turns |
| 1 | 150KHz - 450KHz | 4 mH | 550 turns | 20 turns |
| 2 | 550KHz - 1.65MHz | 310 uH | 65 turns | 7 turns |
| 3 | 1MHz - 3MHz | 100 uH | 28 turns | 2 turns |
| 4 | 2MHz - 6MHz | 23 uH | 10 turns | 2 turns |
| 5 | 5MHz - 15MHz | 3.7 uH | 5 turns | 1 turn |
If you wish to use a fixed (non-antenna) tuning inductor then you will also find the actual inductances required with a 270pf tuning capacitor. If you use the ferrite rod then bands 4 and 5 have the coil situated almost at the end of the rod.
Bands 1, 2 and 3 may be quite usefull since these cover the Long Wave, Medium Wave and Trawler bands. Bands 4 and 5 are not really of any use as a receiver on it's own, but if used in conjunction with a frequency converter, then band 5 could be used to listen to the aircraft band. This band uses 50KHz or 100KHz channel spacing and neighbouring channels are rarely used. A bandwidth of 250KHz at, say, 118.1MHz would not be a problem, then you could probably listen to the airfield approach channel without interference.
Band 0 may be of use in the UK when listening to the Rugby time signal on 60KHz. In this even the capacitor between TR1 collector and the top of the coil should be about 5p6 but both this feedbanck and the tuning caps should be preset. Change also the 1mH choke for at least 10mH. Set the feedback cap to the point of oscillation and adjust the tuning cap for an audio note of about 800Hz to 1KHz from the seconds pips. I believe that freeware computer programs are available for decoding the time signal information, but this aspect lies outside my experience (or interest - I have an old Seiko 5 wristwatch!)
Very best regards from Harry Lythall, Lunda, Sweden.