
I have recently been involved with a few experiments for transfering a PCB patern to a copper clad board. I have tried the "Toner Transfer" method where one prints the image to a Laser printer, but use that brown cookie-paper that the wife uses for baking cakes. Then iron the image onto the board. It works fine, but needs a little practice. This technique I learned from a posting to my message board.
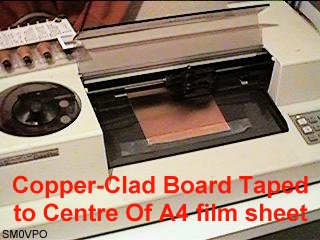
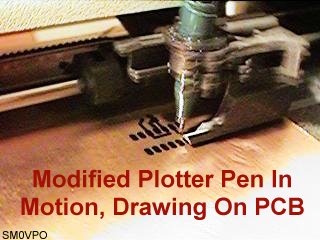
This article is about another method I tried and had 100% success first time. The object is to modify an old plotter pen so that you can draw direct onto the PCB material itself. No photography, just a new pen. All you have to do is the use one of those Faber Castell S overhead marker pens and it works just as well as a Dalo PCB drawing pen, but a lot cheaper. Unfortunately these pens are far too long to stuff into the plotter, you need a little modification. You also need to use an A4 sized bit of film to hold the PCB. I just taped the PCB in the centre and told the plotter program to centre the plot. Easy!
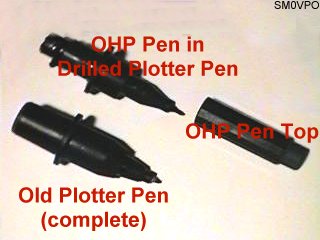
Cut off the top and bottom of the plotter pen so you have a short barrel with the holding ring in the middle. The claw of the plotter uses this to hold the pen. Enlarge the hole a little with a file and pass the felt- tipped pen through it, but only file enough so that you have a tight fit.
Now cut the felt tipped pen short and stuff the end cap back on so you have a short pen. A total length of 47mm is all the HP7440A will take. Now shove it through the modified plotter pen, the ring is located exactly 35mm from the end of the pen nib. Super-glue the felt-tipped in position or it will work loose very quickly. Keep the cap on the felt- tipped pen until the last minute, then replace it as soon as possible. Do not leave the pen in the carousel or it will dry out very quickly.
The ink doesn't last all that long, but who cares? When you saw off the majority of the pen you have a long tube of felt smothered in ink. This you can use to refil the shortened felt-tipped pen. A bit messy, but it can be done without getting your fingers dirty. One small tip, if you do get ink on your fingers, don't touch your face. It makes you look like an idiot! It certainly raised a laugh from Maj-Lis.
Well, there you have it! Now you just take your board out of the plotter and drop it in the etchant. You can have a complete PCB within 30-minutes of deciding, assuming your artwork is already inside the computer. By the way, the board I use is only 1mm thick. I have not tried it on other board materials, but if it does cause a problem, then make the pen 1mm shorter.
Have fun from Harry - SM0VPO