
This year has been terrible for HF communications, and over the past few years, my hearing has not made it any easier. I was basically missing "S" and "T" sounds, indicating significant high-frequency loss. On weak signals buried in the noise, I used to try offsetting the bandwidth—even with Digital Signal Processing (DSP)—but it wasn't enough. In ordinary conversation, I was missing key words, and following speech on the TV had become a struggle.
I approached a hearing centre in Upplands Väsby, but they wanted around $2000 for a device that could be adjusted to compensate for my hearing. Naturally, I decided to do some measurements myself to get a better picture of the loss. From about 4 kHz upward, there is a steady decline.
I found a pair of nice, comfortable, decent-quality in-ear headphones from an old MP3 player. I measured my hearing using these phones and decided I could build my own hearing aid—one tailored specifically to my own ears and the actual earphones I’d be using.
This article describes my home-made hearing aid and how it can be adjusted to suit your own needs. My instrument works perfectly; I can now hear up to 12kHz and beyond, and the finished unit sits comfortably in my shirt pocket.

This project is intended to help with general age-related hearing decline. However, if you experience a sudden or rapid loss of hearing, please skip the soldering iron and head straight to a doctor or hearing clinic. A hearing aid can sometimes mask a physical issue that needs medical attention.
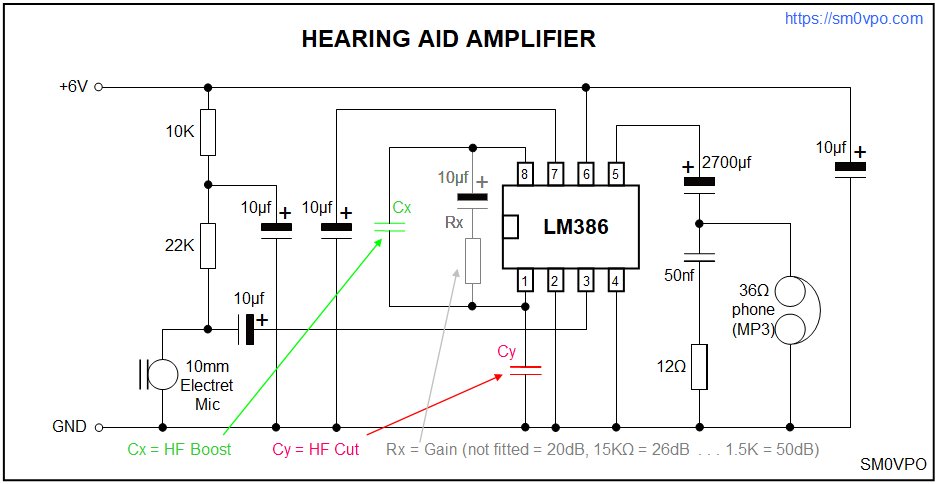
If you look at the circuit diagram above, you will see it is based on the LM386 audio amplifier. The LM386 is a wonderful little 8-pin chip capable of up to 50dB of gain, though that is far more than is ever needed here. My version functions with 20dB of flat gain up to 3.5kHz, at which point the gain steadily rises so that I can hear 8kHz at roughly the same level as 4kHz.
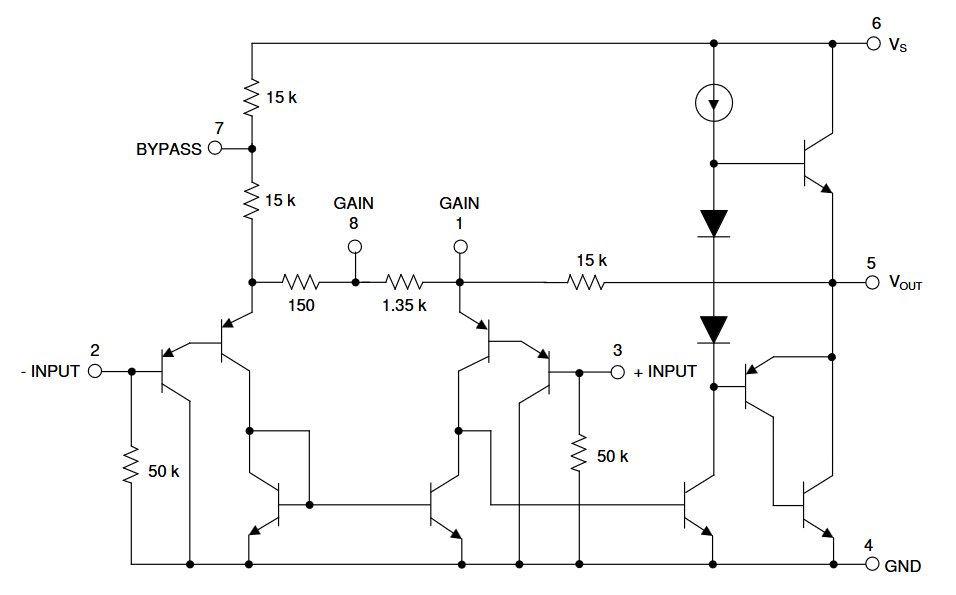
The LM386 is essentially an Operational Amplifier (OpAmp) with a complementary output stage. The +VE and -VE inputs must be kept at 0V (ground) for correct biasing. It also features internal resistive negative feedback to control gain, which we can exploit to provide either treble (HF) boost or cut using a capacitor. "Cy" will cut the higher audio frequencies if needed, while "Cx" will boost them. You can add resistor "Rx" to further modify the gain, but I found that with my chosen microphone and earphones, the standard 20dB gain was just about perfect. If you do require more gain, it should be added in series with a 10µF DC blocking capacitor so you don't alter the amplifier’s biasing (but it works without the electrolytic).
The 33nF capacitor (Cx) was selected specifically to compensate for MY own hearing loss. It creates a "flat-to-boost" knee crossover at around 3.5kHz and reaches an additional gain of about +20dB at 10kHz. Increasing this capacitor value will lower the transition frequency and emphasize the high frequencies even further. The best approach is to feed a signal generator into the microphone input and check the threshold of YOUR own ears at 1kHz, 3.5kHz, and 10kHz. Then, simply select a value that levels out your hearing threshold (the point the signal dissapears) across the audio spectrum.
Note that Electret condenser microphones vary in both output level and low-frequency response, but I found that all the 10mm diameter elements I tested performed well. In fact, all of them worked well beyond the human audio range, and well into the ultrasonic. Great if you want to record bats at night 😉.
The 50nF and 12Ω components across the output are a "Zobel Network," which prevents high-frequency instability (oscillation) in the amplifier.
The quiescent current is a mere 1mA to 2mA, meaning you’ll get a couple of days of continuous use (or about 10 days at 4 hours a day) from a single pair of cells. While the amplifier can draw 70mA on rare peaks, the capacitor across the power rail handles the heavy lifting; the battery rarely sees more than 20mA. During normal conversation. Expect an average drain of around 8mA during conversation peaks.
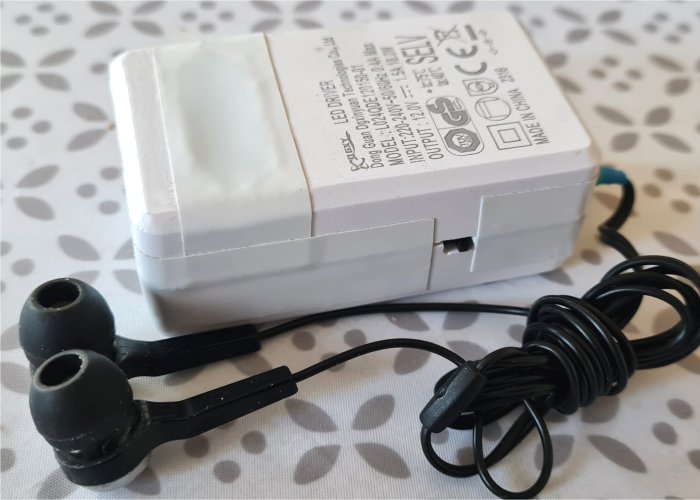
My unit was assembled on a small piece of Veroboard, which is more than adequate. For a housing, I repurposed an old 12V equipment charger. Since it sits in my pocket where nobody can see it, any suitable plastic box will do. Because this isn't exactly a production-line item, I put very little effort into the aesthetics—it was built and boxed in about two hours. The only external control is the ON/OFF switch.
I used discrete components throughout, with the exception of the output capacitor, which is a Surface Mount Device (SMD). This capacitor limits the low-frequency response, so use the largest value you can fit in the box. Using 36Ω stereo headphones wired in series (one for each ear), a 2700µF capacitor provides quite decent reproduction for music.
Power comes from two CR2325 cells in series. To avoid a bulky holder, I used three 1mm thick neodymium magnets: one under the Veroboard, one between the cells, and one to clamp the negative terminal wire to the top cell. It’s a secure connection that makes battery swaps incredibly fast.
I recently bought a cheap, $12 hearing aid from temu.com because it looks much sleeker than my home-made unit. It’s certainly more discreet for restaurants or social gatherings. However, the performance was a surprise: the commercial unit sounds "tinny" and lacks any real bass response. Curiously, this makes it brilliant for speech! The quality is so poor that the high-frequency emphasis actually makes it excellent for understanding dialogue.
That said, the cheap temu.com unit suffers from internal hiss and rumble, making it useless for music. When I have guests over for my Friday G&T evenings, my home-made unit is far superior.
A little tip for my unit is to lay the earphone wires behind your neck. In that way the wires are out of the way and do not get tangled with items in front of you when you are working, or using the radio.
One thing I did notice: the world is a blooming noisy place! When I first went outside wearing this unit, I was hit by a cacophony I hadn't noticed in years—car tires on the roads, kids screeching, the damn birds twittering, mothers pushing perambulators (prams and buggy's), and yet more kids screeching. I now find myself switching the unit firmly OFF the moment I step out the front door!
So thank you very much for paying a visit to Harry's Homebrew Homepages and for reading as far as this. I hope that this project has given you some "food for thought". You can always e-mail me at harry.lythall@[my domain].com. You can even use hotmail@sm0vpo.com (not a tipping error) or british.inteligence.sweden@sm0vpo.com (not a spellling error), as they are both valid e-mail accounts for me 😉, although I would prefer that you visit my messageboard if you have any questions about this or any other project. I always look forward to receiving feedback, whether it be positive or "constructive" 😊
This text was also reviewed with the help of Gemini AI, who has become a good friend and mentor in several of my more recent projects. My brother Ron (G0TLA) in England recently asked Gemini "Do you know my brother Harry Lythall?". Due to the surprising result, it seems that Gemini AI also likes me 😊.
Very best regards from Harry Lythall
SM0VPO (QRA = JO89wo), Märsta, Sweden.